Turning an led ON and OFF using a push button in Snap4arduino
OBJECTIVES:
Turning an LED on and off using a push button sends a signal that Arduino registers and decides whether to turn the LED on or off.
In this practice we will take advantage of the digital inputs to read the status of a switch or button with Arduino.
To do this we will need to correctly perform a specific assembly and the help of two new friends the Pull Down and Pull Up resistors. Although both cases are very similar, the assembly and type of resistance to use will depend on whether we want to press the button or Switch read a value LOW or HIGH.
ASSEMBLY OF PULL-DOWN RESISTORS OR PULL-UP
To solve the assembly correctly we will need the presence of Pull Down and Pull Up resistors. These two resistors are very common in all types of electronic assemblies.
These resistors are connected between the pin and the Arduino reference voltage, which can be 5V or GND. Pressing the buttonforces the voltage value to HIGH or LOW, further limiting the value of current that will pin.
- Resistance Pull-Up maintains a high level (HIGH) when the switch is open.
- Pull-Down Resistance maintains a low level (LOW) when the switch is open.
ASSEMBLING THE PRACTICE
Before you start making electronic circuit assembly, the circuit should be performed in the Fritzing program. It must be known which is the cathode and anode of the LED. Place the anode on the pin 7 and the cathode to the ground resistence, use the 5V pin and connect to the button as shown in the figure.
CODING
Three different exercises are proposed:
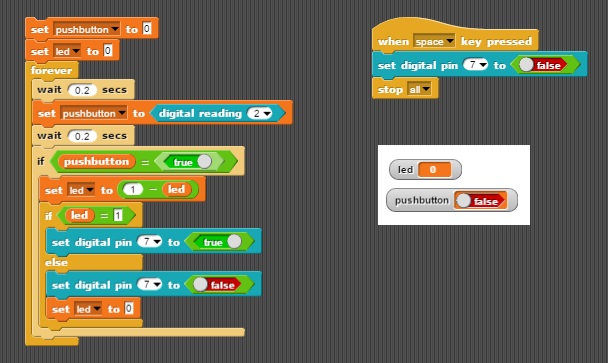
2. With the same pushbutton, we will keep the led on or off. Now the led variable is used to store the previous state, ie, we will use this variable to know if the led was turned off or on before. We continue to use the pushbutton variable to check the digital input of Arduino. You will see that we wait a certain time after checking the state of the pushbutton ... This is to avoid the rebound effect.
3. Now we will enter a second button. The operation will be as follows: With the pushbutton 1 turn on the led and with the pushbutton 2 we will turn off the led. Do you think the code will be longer?
We have to modify the circuit as it appears in the image.
And the code in Snap4Arduino is:
MORE IDEAS TO DO IN CLASS WITH SNAP4ARDUINO
- With practice circuit 1, make the first time to press the LED flashing for 30 seconds.
- With the same previous circuit to make that when pressing only once, it lights intermittently until the push-button is re-pressed, with which the led will turn off.
- With practice circuit 3, make pressing push button 1 flash every 0.5 seconds. If you press button 2, the led will remain fixed. We will turn off the mode of operation of the LED by pressing the button opposite to the one that turned it on.
In this practice a switch has been introduced by means of a pushbutton that serves to activate or deactivate the behavior of the circuit. With a push button, you can activate an LED with the same button and then turn it off. Arduino improves the behavior of a circuit by simply changing the code of Snap4Arduino, it has managed to get a different response from the circuit.


Tunisie Led site de vente en ligne des
ResponderEliminarluminaire tunisie Tunisie led, projecteur en tunisie.
Achetez des lampes LED de qualité aux meilleurs prix en Tunisie chez luminaire tunisie en ligne.
luminaire Led Tunisie, éclairage du futur, la lumière du 3ème millénaire.
Fournisseurs pour Spots d'éclairage à LED en Tunisie.
led Tunisie
eclairage tunisie
prix spot led encastrable tunisie
tube led tunisie
lampe led tunisie led Tunisie eclairage tunisie
lampe led tunisie
led Tunisie
legrand tunisie
somef tunisie
stiel by alpha tunisie
électricité tunisie
matriel bricolage tunisie
Muchas gracias, muy bien explicado.
ResponderEliminar