martes, 18 de abril de 2017

HC-SR04 on Snap4Arduino

HC-SR04 SENSOR WITH SNAP4ARDUINO

ULTRASOUND SENSOR


OBJECTIVES

Learn how an ultrasound sensor works

Set Snap4arduino to use this sensor

See the possibilities offered by this sensor in robotic applications 


WHAT IS A HC-SR04 ULTRASOUND SENSOR?


The HC-SR04 sensor is a sensor for measuring distances. It is based on sending a non-audible high frequency pulse to the human being. This pulse bounces on nearby objects and is reflected towards the sensor.

By measuring the time between pulses (back and forth), and as we know the speed of sound, we can estimate the distance of the object.

Ultrasonic sensors are cheap and simple to use, but low accuracy sensors. The orientation of the surface to be measured can distort the measurement. These sensors are not suitable in environments with large number of objects because the sound bounces on the surfaces generating echoes and are not suitable for outdoor operation.

The measurement range of the HC-SR04 sensor is from 2 cm to 400 cm, with a resolution of 0.3 cm.

Despite this low accuracy, the sensors are widely used in applications with Arduino to detect obstacles. 


ASSEMBLING THE PACTICE


This module, apart from the power pins uses two pins: one to emit the pulse (Trig) and another to receive the rebound of this powder (Echo).

The operation of the HC-SR04 is based on an echo system:

  • Send a high digital pulse (10μs minimum) through the TRIG pin. 
  • Receive the bouncing waves through the ECHO pin. 
  • Count the time it took to receive the signal. 

But all this procedure is built in a snap4arduino bookstore, so fortunately we do not have to worry about making any calculations. To operate the sensor it is necessary to install the Arduino-signed Snap4Arduino-master in our Arduino card and then import the Ultrasound_HC_SR04_blocks file with snap4arduino. Here you can see how the complete process is performed.

The sensor will then connect to Arduino:
  • The pin 10 to the TRIG pin. 
  • Pin 9 to the ECHO pin.


And the code you should load into Snap4Arduino is as follows:


Now build this circuit


CODING

When you have completed the circuit, I propose you two challenges:
  1. Build an alarm. Each time the sensor detects an object less than 25 cm away, the buzzer must be activated with a flashing beep.


2. Make buzzer beeps quicker as we move an object closer to the sensor. The further away the object from the sensor, the beeps the buzzer will emit will be more spaced. When I press space, everything will stop.


MORE IDEAS TO IN CLASS WITH SNAP4ARDUINO 
  1. Build a mobile radar. On a servomotor mount an ultrasonic sensor HC-SR04.
  2. To the previous mobile Radar we added a Keyes KY-008 laser module that is mounted on another servomotor will move in the same direction as the radar and fire a laser when the sensor detects an obstacle.


sábado, 15 de abril de 2017

Using a servomotor in Snap4arduino

USING A SERVOMOTOR IN SNAP4ARDUINO

OBJECTIVES:

To know what a servomotor is and its differences with a normal motor

Understand how it works and learn to use a servomotor

Today we will learn to operate a servomotor using pushbuttons and potentiometers that we have already learned in previous lessons


WHAT IS A SERVO?

A servomotor is an electric motor, but with two special characteristics that make it very useful in many home or industrial applications, On the one hand, it allows us to maintain a position that we indicate (within a range, which can be 180 or 360 degrees), Also allows us to control the speed of rotation, we can make that before it moves to the next position wait a while.
The servos have internal gears that provide high torque and a high degree of precision (depending on the model), but they provide smaller turning speeds than ordinary DC motors.


Normally these small servos operate on 5V and the control is realized by means of a control signal PWM, in which the width the pulse indicates the angle that we wish to adopt the axis, with a working pulse between 1 ms and 2 ms and with a period Of 20 ms (50 Hz). This tells us that we can only change positions every 20 ms. This will depend on the type and brand of our servo.

What does this mean that I have said before? You will see it more clearly with this image.


Communication of the desired position is performed by the transmission of a pulsed signal with a period of 20ms. The width of the pulse determines the position of the servo.

In general, on all models:
  •          A pulse between 500-1000 us corresponds with 0º
  •          A pulse of 1500 ms corresponds with 90º (neutral point)
  •         A pulse between 2000-2500us corresponds to 180º


ASSEMBLING THE PRACTICE

Connecting a servo to Arduino is simple. The servo has three cables, two power (GND and Vcc) and one signal (Sig). The colour scheme normally follows this code:
  • ·     Brown (GND), Red (Vcc) and Orange (Sig)

However, there may be other colour codes to control the servo, here is an image with other possible codes.


The code that we will perform to see the operation of the servomotor is very simple, it is about making the position vary 5 degrees every 0.3 seconds from the position of 0 degrees, until reaching the position of 180 degrees, once reach this position It will turn in the opposite direction until it reaches the 0 degrees again, moment that will reverse the turn again and so on indefinitely.

And the assembly scheme of the practice we will perform is as follows:


And the code you should load into Snap4Arduino is as follows:


Now that you have seen the operation of the servomotor, perform this circuit:


CODING


Once you have completed the circuit, I propose these challenges:
1. As you can see, there are two buttons. These pushbuttons serve to direct the direction of rotation, each time you press the servomotor will change direction until it reaches the end point, where it will be stopped and will only start if the button is pressed in the opposite direction.


2. Change the pushbuttons by a 1KΩ potentiometer. Now the operation will be as follows:
  • <150Ω: servomotor off
  • 150 and <250Ω: servo motor rotates right and stops when it reaches 180 degrees
  • 250 and <500Ω: servomotor turns left and stops when 0 degrees
  • 500 and <750Ω: servo motor rotates right (from position 0), reaches 180 and reverses rotation, stops when it reaches 0
  • 750Ω: servomotor off
 
3. The third challenge is to add 4 LEDs to indicate the mode of operation of the previous challenge.


MORE IDEAS TO IN CLASS WITH SNAP4ARDUINO

     1. Build a mobile radar. On a servomotor mount an ultrasonic sensor HC-SR04. 

     2. To the previous mobile Radar we added a Keyes KY-008 laser module that      mounted on another servomotor will move in the same direction as the radar    and fire a laser when the sensor detects an obstacle.


domingo, 2 de abril de 2017

Potentiometer in Snap4Arduino

POTENTIOMETER IN SNAP4ARDUINO

OBJECTIVES:


See the analogue value of a potentiometer by the Arduino serial port shown on the Snap4Arduino screen.


Today we will learn to read the position value of a potentiometer to regulate the on and off of a few leds.


In this practice, we will learn which are the analog values of a signal and the analog-digital conversion.


WHAT IS A POTENTIOMETER?

A potentiometer is a variable resistor in which we can choose the value it can take. If it is totally closed we will obtain as output the maximum voltage (the input voltage), if we have it totally open, we will obtain 0 volts and if we have it in an intermediate position we will obtain a fraction of the input voltage proportional to the position in which it is. This is called 
a voltage divider.


There are several types of potentiometers but the most common are:
  • Linear potentiometers, whose resistance is directly proportional to the angle of rotation. 
  • Logarithmic potentiometers, whose resistance value depends logarithmically on the angle of rotation.
In the linear potentiometers, in the middle of the path we get 50% of the voltage but this does not occur in the logarithmic since in the middle of the route we will return a higher percentage, the proportion in this case is not linear and describes an upward curve, these potentiometers Are mostly used for audio applications.

In our use with Arduino, we can use for example to regulate the light intensity of a Led, the speed of a DC motor, or the position of a servo.

The potentiometers usually have 3 pins, and we have to identify the functionality of each before connecting. One pin will be connected to the power supply, another to earth or GND and finally the third pin will be the output of the potentiometer.


ASSEMBLING THE PRACTICE

In the Arduino UNO board we have 6 analog pins, from A0 to A5 and their common use is the reading of data of analog devices as is the case of the potentiometer. They have a resolution of 10 bits which means that we have 1024 different values, ie we can read a range of voltages from 0V to 5V detecting voltage changes of 0.004V (5/1024). So the values we get will go from 0 to 1023.


And as the best way to understand something are the examples, we start with one that through the serial monitor we can see what values we are obtaining in an analog pin as we change the position of the potentiometer.


And the code you should load into Snap4Arduino is as follows:


Now that you've seen the operation of the analog-digital conversion, performs this circuit:


CODING

Once you've made the circuit, I propose these challenges:

  1. Using a 1KΩ potentiometer, let the leds light up gradually following this table: 
    1. <150Ω: all leds off
    2. >150 and <250Ω: Only one ledis lit
    3. >250 and <500Ω: Two leds are lit 
    4. >500 and <750Ω: Three leds are lit
    5. >750Ω: All leds on

     And the code is:


    2. In the second challenge, you have to blink all the leds at once, but as you           turn the potentiometer, the leds will flash faster and faster.


      3. In the third challenge, you have to make the leds illuminate more or less           intensity according to the position of the potentiometer.

In this challenge, we have to use Pulse Width Modulation (PWM), this is a small advance of what we will do in the next sessions, but it is a good example for the beginning. You will see that in the code we do a mathematical operation, this operation is used to limit to 255 at most the output that Arduino will have.


MORE IDEAS TO IN CLASS WITH SNAP4ARDUINO 

  1. Modifies the challenge code 1 Snap4arduino to do the following:
  • > 150Ω: the first ledstays on steady 
  • > 250Ω: the first ledstays steady and the second flashes 
  • > 500Ω: the first and third ledare fixed, the second flashes
  • > 750Ω: first and third ledfixed and second and fourth flash 
    2. The lights will go from side to side as a fantastic car, but the speed will be           controlled by the position of the potentiometer. 

   3. Led lighting control "Leduino". When the potentiometer is at the ends, the leds are off, when the potentiometer is ¼ of the way, the leds light up consecutively from right to left, when the potentiometer is in the middle, the leds remain lit and when the potentiometer is To ¾ of the maximum, the leds change of direction.


CONCLUSION

In this session we have learned several important things:

  • How a potentiometer works.
  • We are ready to use the analog inputs.
  • We have learned to regulate the output voltage.


domingo, 26 de marzo de 2017

Turning an led ON and OFF using a push button in Snap4arduino

Turning an led ON and OFF using a push button in Snap4arduino


OBJECTIVES:

Turning an LED on and off using a push button sends a signal that Arduino registers and decides whether to turn the LED on or off.


In this practice we will take advantage of the digital inputs to read the status of a switch or button with Arduino.


To do this we will need to correctly perform a specific assembly and the help of two new friends the Pull Down and Pull Up resistors. Although both cases are very similar, the assembly and type of resistance to use will depend on whether we want to press the button or Switch read a value LOW or HIGH.

ASSEMBLY OF PULL-DOWN RESISTORS OR PULL-UP

To solve the assembly correctly we will need the presence of Pull Down and Pull Up resistors. These two resistors are very common in all types of electronic assemblies.

These resistors are connected between the pin and the Arduino reference voltage, which can be 5V or GND. Pressing the buttonforces the voltage value to HIGH or LOW, further limiting the value of current that will pin.
  • Resistance Pull-Up maintains a high level (HIGH) when the switch is open.
  • Pull-Down Resistance maintains a low level (LOW) when the switch is open.


ASSEMBLING THE PRACTICE

Before you start making electronic circuit assembly, the circuit should be performed in the Fritzing program. It must be known which is the cathode and anode of the LED. Place the anode on the pin 7 and the cathode to the ground resistence, use the 5V pin and connect to the button as shown in the figure.


CODING


Three different exercises are proposed:

  1. This is the simplest, when the pushbutton turns on the LED LED, when you release it goes off. We need to create a variable called push button to check the status of pin 2. We have also created another variable called led to see on the computer screen its status.


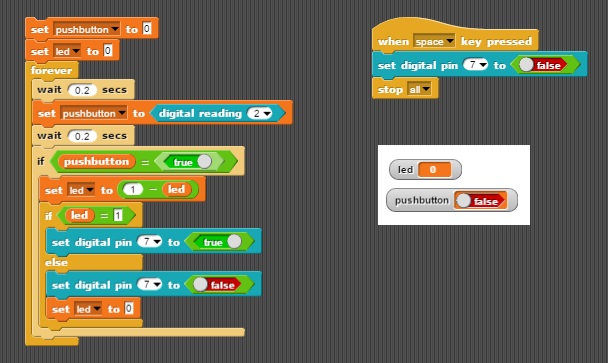
   2. With the same pushbutton, we will keep the led on or off. Now the led     variable is used to store the previous state, ie, we will use this variable to know if the led was turned off or on before. We continue to use the pushbutton variable to check the digital input of Arduino. You will see that we wait a certain time after checking the state of the pushbutton ... This is to avoid the rebound effect.


   3. Now we will enter a second button. The operation will be as follows: With the pushbutton 1 turn on the led and with the pushbutton 2 we will turn off the led. Do you think the code will be longer?
We have to modify the circuit as it appears in the image.


And the code in Snap4Arduino is:


MORE IDEAS TO DO IN CLASS WITH SNAP4ARDUINO

  1. With practice circuit 1, make the first time to press the LED flashing for 30 seconds.
  2. With the same previous circuit to make that when pressing only once, it lights intermittently until the push-button is re-pressed, with which the led will turn off.
  3. With practice circuit 3, make pressing push button 1 flash every 0.5 seconds. If you press button 2, the led will remain fixed. We will turn off the mode of operation of the LED by pressing the button opposite to the one that turned it on.

CONCLUSION

In this practice a switch has been introduced by means of a pushbutton that serves to activate or deactivate the behavior of the circuit. With a push button, you can activate an LED with the same button and then turn it off. Arduino improves the behavior of a circuit by simply changing the code of Snap4Arduino, it has managed to get a different response from the circuit.